Today we’re going to look at the Lightroom export settings needed to make your photos look good on social media and when printing them at a photo lab.
Social media has made it easy for us to share our photos and get seen by a lot more people than just our family and friends.
I’m going to explain how we could use the export dialogue box and the print module to export your photos for social media and printing.
Yes! I did say the print module. It’s actually quite powerful and the fact you can export to Jpeg. Makes it perfect at creating blog boards and collages for use on online.
Export Dialogue Box or Lightroom Print Module?
When should you use the export dialog box? When should you use print module to export your photos for social media?
Both modules will allow you to export a single photo or a group of photos in one go.
The main difference is that the print module allows you to create collages and borders. You can also use the identity plate to add text Smith family portrait or Engagement Bondi Beach, something like that.
Using the export dialogue box can do multiple photos in one go but you can’t create collages and you can only a watermark.
Using The Identity Plate To Add Text
The identity plate within the print module can be used to add a simple text watermark. You could also use it to write a special message – e.g. creating a collage with a white space in the middle to separate the photos and text saying a message such as just married or engaged or smith family portraits.
Should I Watermark My Photos?
Watermarking is a personal preference. So many people are for it and against it.
Recently i did a simple test and tested the theory do water marked photos get less shares or likes.
I posted photos on Instagram and Facebook the same time everyday for two weeks with and without watermarks.
What I found was if a photo evokes emotion. It doesn’t really matter if it does or does not have a watermark. Unless the Watermark is quite prominent and takes up a lot of the photo, like in the center . In which case the photo will get passed over.
Watermarking is good for branding and doing it could be a simple as your logo somewhere within bottom left or right corner of the photo.
You could use the print module and create and a white border. Place the watermark within the border so it doesn’t detract from the photo but still have your branding.
Watermarking could also deter people stealing your photos. But if someone wants the photo they will crop out your logo / watermark. Which is why you should add photo metadata to all your photos before exporting.
TIP: Do an export for each social media platform you wish to post and upload the photos to your favourite online storage for later posting via your phone or desktop.
When it’s time to export your edited photos from Lightroom. Start an extra export for social media. At the same time you can rename the photo resize, and placed into separate folders.
Upload the folders to your favourite online storage such as Dropbox, One Drive or Google Drive. Now what you have is a collections of photos resized and ready for posting to social media.
The bonus is you will have a collection of your favourite photos ready to post from your mobile or desktop.
If you want us to take it one step further, you could use the bufferapp to automate posting to twitter, Facebook, Pinterest and Instagram. But before you scheduled your posts make sure to plan your photography ideas first.
Related Reading: Lightroom Import Settings: Get a head start on your editing.
Lightroom Export Settings For Social Media
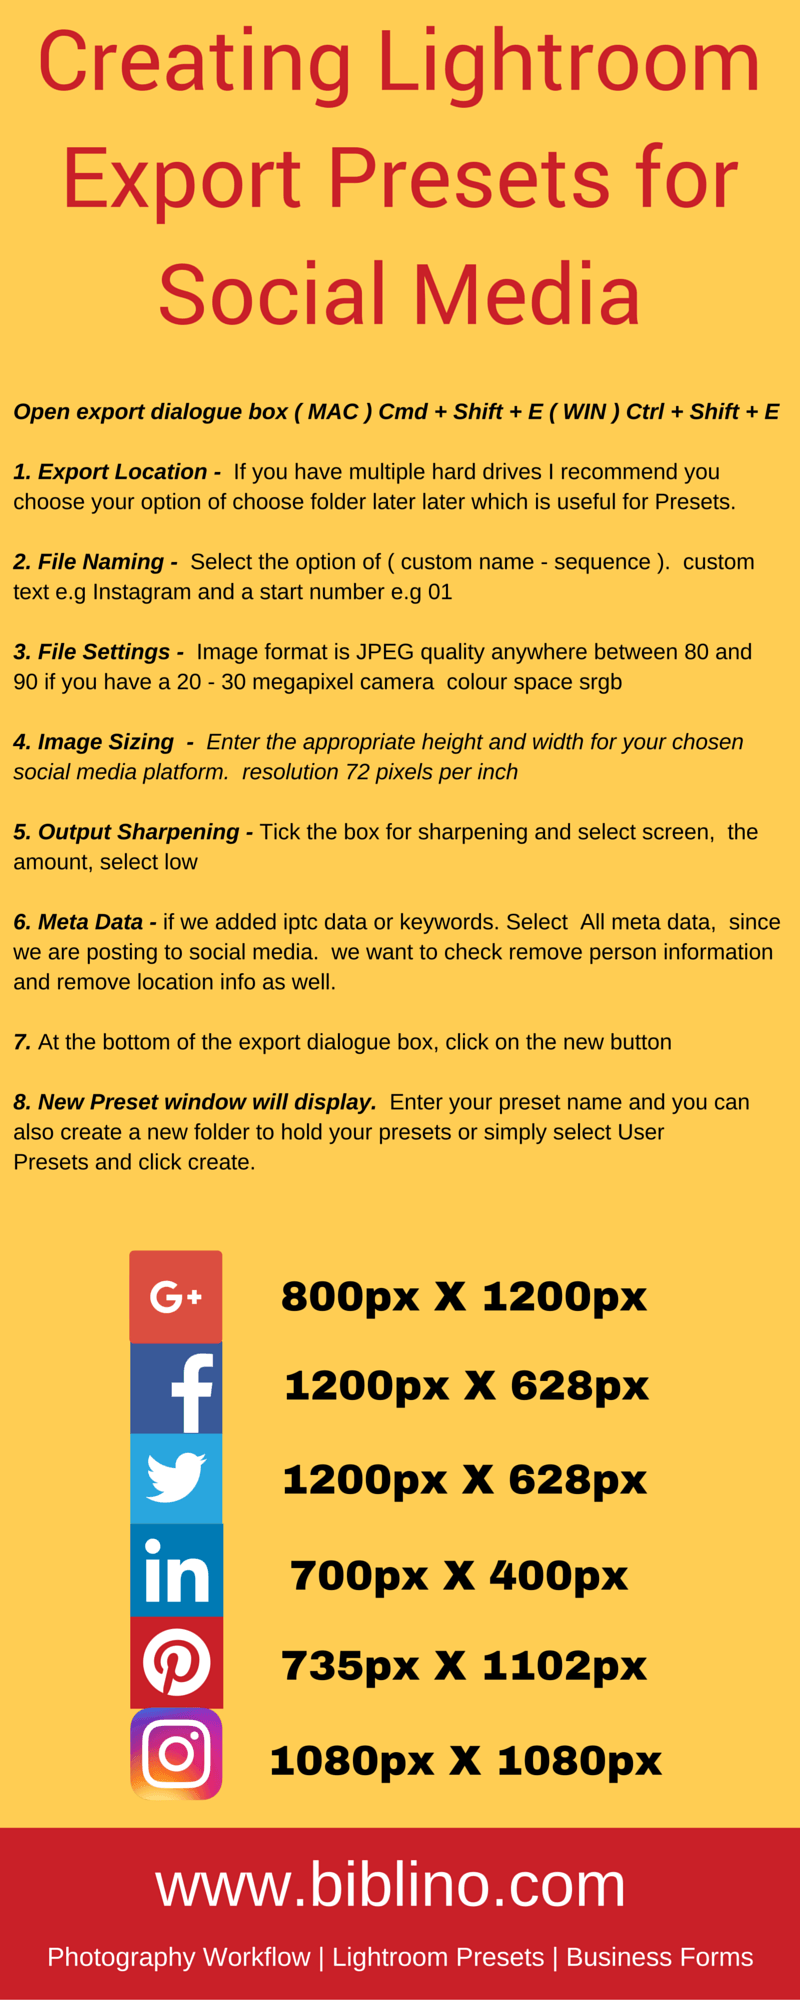
The below sizes are in pixles ( px )
Facebook 1200 x 628
Instagram 1080 x 1080
Pinterest 735 x 1102
Twitter 1200 x 628
LinkedIn 700 x 400
Lightroom Export Settings for Instagram
Instagram uses a square photo format in it’s feed. You can still use a landscape or portrait orientation photos but white bars will be added to fill the square frame.
Below are instructions to export your photos ready for upload into Instagram’s square format
Select your images for export and the use the shortcuts Ctrl + shift + E to bring up the Export dialog box.
Change the following settings in the export dialog box
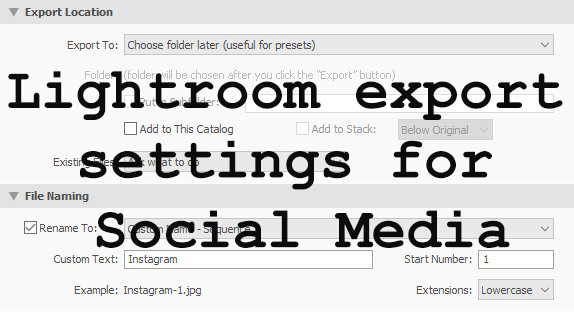
- Export Location: Select a folder on your hard drive.
- File Naming: Select the option of ( custom name – sequence ). custom text e.g Instagram and a start number e.g 01
- File Settings: Image format is JPEG
- Quality: 80
- Colour Space: srgb
- Image sizing: Enter the height and width of 1080 x 1080
- Resolution: 72 pixels per inch
- Output Sharpening: Check the box for sharpening and select screen, amount set to low
- Click the export button to begin the process.
Lightroom Export Settings for Facebook
Facebook will happily display your photos in either landscape or portrait orientation without modifying your photos.
But to get maximum screen real estate in a Facebook post. You should use a landscape oriented image.
Below are instructions to export your photos ready for upload into Facebook. The Image size will work for both portrait and landscape.
Select your images for export and the use the shortcuts Ctrl + shift + E to bring up the Export dialog box.
- Export location: Select a folder on your hard drive.
- File Naming: Select the option of ( custom name – sequence ). custom text e.g Facebook and a start number e.g 01
- File Settings: Image format is JPEG
- Quality: 80
- Colour Space: srgb
- Image sizing: Enter the width and height of 1200 x 628
- Resolution: 72 pixels per inch
- Output sharpening: Tick the box for sharpening and select screen, the amount, select low
- Click the export button to begin the process.
Lightroom Export Settings for Printing
To prepare your images for printing is relative easy. First step would be to contact your photo lab and ask settings they prefer photos to be submitted in.
File format, color space and file dimensions are important. But for the majority of photo printing labs, files sent in JPG file format and sRGB colour space will be fine for a high quality print.
As for what size to send your photos it would depend on the print size and how it relates to your camera sensor.
Sounds complex but Is easy to remember if you use the following print sizes. 4 x 6, 8 x 12 16 x 24, 20 x 30
3:2 is the aspect ratio of a 35mm camera such as a full frame or crop sensor digital camera by the major brands.
Exporting your photos in the full resolution i.e. leaving the height and width dimensions blank.
It’s only if you wanted to make a print as a 5 x 7, 8 x 10, 11 x 14, 16 x 20 and 24 x 36 which are not native ratios to your camera image sensor.
Ultimately you would need to enter a specific dimension to get the correct images sizing for printing. Otherwise your photos will be printed with white bars to compensate.
Below are instructions to export your photos ready for printing. The Image size will work for both portrait and landscape.
Select your images for export and the use the shortcuts Ctrl + shift + E to bring up the Export dialog box.
- Export Location: select a folder on your hard drive.
- File Naming: Select the option of ( custom name – sequence ). custom text e.g print and a start number e.g 01
- File Settings: Image format is JPEG
- Quality: 100
- Colour Space: srgb
- Image Sizing: leave blank
- Resolution: 300 pixels per in
- Output Sharpening: Tick the box for sharpening and select matte, the amount, select low
- Click the export button to begin the process.
Creating An Export Preset Using The Export Dialogue Box
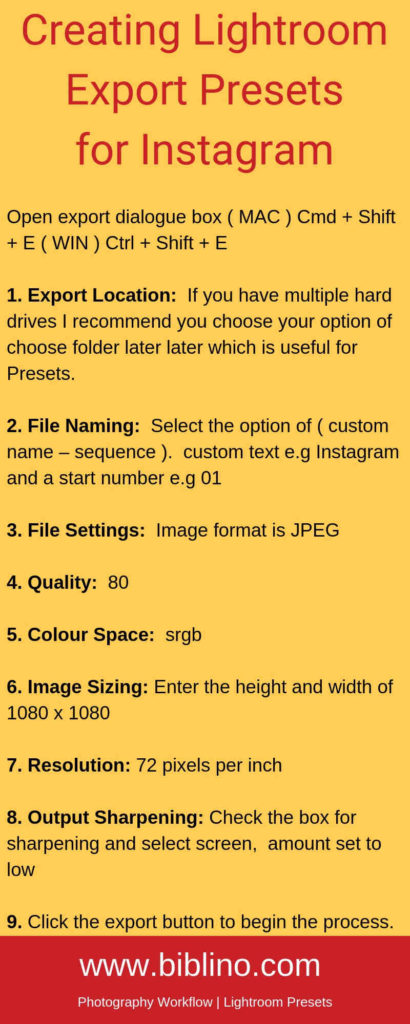
- From the grid view or develop module use the keyboard shortcut ( MAC ) Cmd + Shift + E or ( WIN ) Ctrl + Shift + E to bring up the Export dialog box
- Export location – If you have multiple hard drives I recommend you choose your option of choose folder later later which is useful for Presets.
- File Naming – Select the option of ( custom name – sequence ). custom text e.g Instagram and a start number e.g 01
- File settings – Image format is JPEG quality anywhere between 80 and 90 if you have a 20 – 30 megapixel camera colour space srgb
- Image sizing – Enter the appropriate height and width for your chosen social media platform. resolution 72 pixels per inch
- Output sharpening – Tick the box for sharpening and select screen, the amount, select low
- Meta data if we added iptc data or keywords. Select All meta data, since we are posting to social media. we want to check remove person information and remove location info as well.
- At the bottom of the export dialogue box, click on the new button
- A “ New Preset window will display. Enter your preset name and you can also create a new folder to hold your presets or simply select User Presets and click create.
Use This Handy Infographic Next Time You Post On Social Media
Leave a Reply
You must be logged in to post a comment.